Wednesday, August 1, 2012

Jammin' Salmon Burgers


Ingredients
For Burgers:
2 teaspoons freshly chopped parsley leaves
1/2 Vidalia onion, diced
2 eggs
1/2 cup panko bread crumbs
1/2 teaspoon cracked black pepper
1 teaspoon kosher salt
1 lemon, zested
4 tablespoons Dill Mayonnaise, recipe follows
2 (6 1/2-ounce) cans Alaska skinless and boneless pink salmon, drained well
2 tablespoons grapeseed oil
Directions
Preheat oven to 400 degrees F.

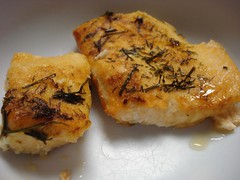
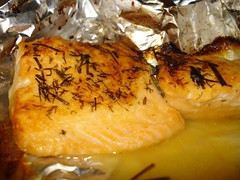
In medium bowl, combine, parsley, onions, eggs, panko, black pepper, salt, lemon zest and Dill Mayonnaise together. Add drained salmon and mix well together. Make 4 patties and set aside.

In a large skillet on medium, heat 2 tablespoons of grapeseed oil. Place burgers in skillet. Cook over medium heat until browned. Turn and brown other side. Place in oven for 3 to 4 minutes.

Serve on buns with Dill Mayonnaise.

Dill Mayonnaise:
1/2 cup mayonnaise
1/2 lemon, juiced
2 tablespoons freshly chopped dill leaves
Pinch cayenne pepper
1/2 teaspoon salt
1/2 teaspoon cracked black pepper
Combine all the ingredients in a small bowl and set aside.

Friday, May 27, 2011

Baked Salmon

SalmonIt's among the easiest of my recipes, but I never think to post it. Since this blog's in danger of becoming a "dessert blog" I thought I should post something healthy too :)

I can remember years ago not liking salmon at all but one day I decided to try it again and I guess tastes do change because I like this a lot these days.

Among the fillet-type fish I used to favor mild white fish, but given a choice (unless one is stuffed, I love stuffed foods) between baked (no-filling) cod (or similar) and baked salmon, I think I'd choose the salmon. It's meaty, but soft and mild. Unlike tilapia, which to me is the 'meatiest' fish I've ever had and I don't like it very much for some reason. Maybe that will change too, someday. For now, bring on the salmon!


Simple Salmon

1 salmon fillet (one side has skin, a lengthwise cut; same method for a steak)
dill (fresh or dried), to taste
lemon and pepper, to taste
non-fat cooking spray (or a little olive oil, or non-stick aluminum foil)

Line your cooking vessel of choice with foil (regular or non-stick).

Spray on some non-stick spray. Lay your fillet skin-side-down (if it's a steak, either side down is fine).

Sprinkle with dill, and drizzle with a little lemon.

SalmonBake at 350ºF, uncovered, until firm and pink throughout. Depending on the size of your fish steak/fillet, about 30-45 min.

Add more lemon to taste. And pepper if you like. Pairs well with rice and veggies or flaked over pasta.

Delicious!

Thursday, March 24, 2011

Instructables

I love the Instructables website. Lot's of how-to's on just about everything and lots of fun stuff in general. Plenty of things I wouldn't dare try but some, like the recipes I do. Here's a few shots of a few I tried, with the links to the relating Instructable. I don't want to detail these because the instructions are pretty good as is.

First thing was the Microwave-in-a-mug popcorn, for when you want just a little bit.
Mug microwave popcorn Mug microwave popcorn
This worked great except I won't use a glass mug anymore because it gets screaming hot and stays that way for a long time. The photos are from the first try, as you can see I used too much popcorn so next time I know to use a little less.


Using the same mug (on a different day), I tried the Brownie for one, a "from scratch," single-serve brownie dessert that you can make as gooey as you like.
Microwave brownieMicrowave brownie
It wasn't pretty but it was very good. Definitely a quick fix for a chocolate urge.


I wanted to make thumbprint cookies for Christmas and searched for recipes. The one that looked the best to me were the Miniature Danish Cookies.
Apricot thumbprintApricot thumbprints

These were fun to make. I think I made them smaller than I should have but that just made more cookies, which isn't a bad thing at all. I also made chocolate thumbprints but that was another recipe (found here, minus the mint).


The latest Instructable I tried were the homemade Cadbury-like Creme Eggs.
Chocolate creme eggsSettingHomemade Chocolate Creme EggMmmmm!

Wow, these were awesome! Not an exact match to a Cadbury Creme Egg, but as close as you can get. I made a half batch of the linked recipe and that was about 12 mini eggs. I don't have egg molds so I made them into pops. I don't think it would be difficult at all to work our way through a whole batch, so next time I plan to make the full recipe. I froze a couple of them too, so I can see if they're good once defrosted. I stored the rest in the fridge. They didn't last long!

I have a bunch more Instructables saved as favorites to try sometime so I may have more experiments to post at some point. These were fun and easy, always a plus.

Friday, March 18, 2011

Fudgesicles

Super easy.

Three ingredients:

Soy milk
Glug of half & half (maybe 2 TBL worth)
Healthy squeeze of dark chocolate syrup

(amounts vary depending on how many pops, I used an 8.25oz single serve container of vanilla soy milk)

Mix well or pour into a bottle and shake well until syrup is dissolved.

Pour into your pop molds, freeze several hours or overnight.
Frozen pops to be

Un-mold, usually have to dip the bottom part in hot water. For the molds I used I had to also dip the top part a second.
fudgesicle

Enjoy!
Yum!

I worried about the texture of frozen soy milk because even the Silk website says frozen then defrosted soy milks texture isn't good but supposedly it's fine for desserts/frozen items. And I've used soy milk for ice cream so this was a good experiment. A bit of an icy/watery texture but sufficiently creamy enough for a quick pop fix. Especially for those times when I can't fit my ice cream maker freezer bowl in the freezer, which is pretty often.

Sunday, March 13, 2011

Pancakes

Pancakes from scratch When I want pancakes I usually just open a mix but making them from scratch is so worth the effort. There are plenty of recipes out there and plenty of variations. For my first try at this I wanted something easy that didn't require buttermilk because I never buy that. I used a recipe from here but tweaked it by using some of the suggestions in the comments. Also used soy milk instead of milk. Results? A really light and delicate, very delicious pancake breakfast that was totally worth the minimal effort of measuring and melting.

My adapted version:

1 cup all-purpose flour
2 tablespoons white sugar (can really be reduced to 1 TBS)
1 and a 1/2 teaspoons baking powder
1/4 teaspoon salt
1 egg, beaten
1 cup soy milk
2 tablespoons butter, melted
1 Tsp. vanilla extract

For the soy milk, I used a whole single serve container of Silk Very Vanilla which is 8.25oz and sweetened so technically I didn't need the sugar at all. If I hadn't used the whole container, these might have been fluffier but they were fine as is.

In a large bowl, mix flour, sugar, baking powder and salt. In a smaller bowl mix the egg, vanilla, and soy milk together. Add the melted butter and mix well. Add the wet mixture to the flour mixture and stir until smooth.

Pancakes from scratch


Heat a lightly oiled griddle or frying pan over medium high heat. Pour or scoop the batter onto the heated pan, using approximately 1/4 cup for each pancake. When bubbles form it's time to flip, cooking until lightly browned on both sides.


Yummy, pancakes!

Serve hot with butter, syrup, jam, whipped cream and fruit, or any other way you love to eat pancakes. Plenty of options.

Saturday, February 14, 2009

Popovers

A very merry breakfastA picture sure can be suggestive. I saw a photo of some popovers on Flickr and suddenly wanted to try some. It occurred to me that I'd never made popovers before (or scones for that matter 'till recently) so I'd have to find a recipe (no recipe with the Flickr photo).

No problem there. Lots of recipes out there. I tried this one because it looked easy and you could change the serving size (and have the correct ingredient amounts) with their handy dandy converter.

Slightly under beaten popover but still quite yummyAnd I learned a lesson or two as well -- don't use butter to butter the sides or popovers won't pop, they'll have a sunken in spot on the bottom, use non-stick spray...and don't forget to use the non-stick spray as I did once or the popovers will stick to the muffin tin (I don't have a popover pan).

Also, don't be afraid to mix them well. I always worry about over mixing but in this case a few more beats would've been ok.

Still... they came out very good. They were light, airy, and yummy with butter or jam or both. I'll definitely be making them again. A great weekend treat.

The recipe:

2 eggs
1 cup all-purpose flour
1 cup milk
1/2 teaspoon salt


Popovers fresh from the ovenPreheat your oven to 450F. Grease and flour six custard cups or the cups of your muffin pan. Or, coat with non-stick cooking spray (as I did on the batch that came out the best for me).

In a medium bowl beat the eggs slightly, beat in the flour, milk, and salt, until just smooth. Try not to over beat. Fill your custard or muffin cups 1/2 full.

Bake at 450F for 20 minutes. Decrease the oven temperature to 350F and bake for 20 minutes more. Immediately remove from cups and serve hot.

Sunday, January 18, 2009

The peanut butter ice (cream) experiment

Peanut butter ice milkI knew I had an ice cream maker somewhere in this house. Found it recently and after this little experiment, remembered why I stored it away... I can't make decent ice cream. But I'm going to keep trying (so long as the thing keeps working anyway) because one of these days I'll get right.


Pouring the ice milk mixture into the ice cream maker

This? Was an adaption from a bunch of different recipes and another something I forgot... soy milk added to a cream mixture makes ice milk (or ice, period), not ice cream. Still, for a first try (in so many years), it was ok. I have something else in mind for any future attempts... like actually using cream (not half & half) and also trying this recipe with peanut butter (I'm allergic to hazelnuts) sometime soon.

I should've used all half & half for this recipe but I was trying to "healthy it up" a bit but by doing so it changed the texture. A lot!


The ice milk mixtureThe recipe:

1 1/2 cups half & half
1 1/2 cup soy milk
(should have tried 2 1/2 cups 1/2 & 1/2 and 1/2 cup soy milk)
3/4 cup natural peanut butter
1/4 cup powdered milk
1/2 cup sugar


I heated all the ingredients in a saucepan until the sugar and powdered milk was dissolved and the peanut butter was melted. Stored the mixture in the fridge and added it to the ice cream maker per instructions the next day.

Peanut butter ice milk
The result was a peanut butter ice milk concoction (that I took out of the freezer and stirred every hour for a few hours to help thicken it up) that wasn't bad at all but not what I was hoping for.

Better luck next time.